介绍 Mybatis 通过提供插件机制,可让用户根据自己的需求对 Mybatis 的功能实现增强。我们常用的如 PageHelper、Mybatis-plus 等都用到了Mybatis 的插件机制
拦截对象 众所周知,Mybatis 中有以下四种可供拦截的核心对象
Executor : 执行器的拦截,用于执行增删改查操作ParameterHandler :SQL参数处理器ResultSetHandler :SQL执行的返回结果集处理器StatementHandler :数据库的处理对象,用于执行SQL语句
通过拦截这四个对象,我们便可在 Mybatis 执行的过程中 “插一脚”
自定义插件 自定义一个简单的输出查询语句SQL的插件
1
2
3
4
5
6
7
8
9
10
11
12
13
14
15
16
17
18
19
20
21
22
23
24
25
26
27
28
29
30
31
32
@Intercepts ({ @Signature (type = Executor.class , method = "query" , args = {MappedStatement.class , Object .class , RowBounds .class , ResultHandler .class }) }) @Component public class LogInterceptor implements Interceptor @Override public Object intercept (Invocation invocation) throws Throwable MappedStatement ms = (MappedStatement) invocation.getArgs()[0 ]; Object parameter = invocation.getArgs()[1 ]; BoundSql boundSql = ms.getBoundSql(parameter); System.out.println(boundSql.getSql()); System.out.println(parameter.toString()); return invocation.proceed(); } @Override public Object plugin (Object target) if (target instanceof Executor) { return Plugin.wrap(target, this ); } return target; } @Override public void setProperties (Properties properties) } }
自定义插件大致分为以下几个步骤:
新建一个类,并且实现 org.apache.ibatis.plugin.Interceptor
类上添加 @Intercepts,以及 @Signature 注解,声明要拦截的对象和方法,Signature 参数说明:
type:要拦截的对象(四大拦截对象)
method:拦截的对象的方法名称
args:拦截的方法的参数列表
让Mybatis能够发现你的拦截器,这里整合了 Springboot,因此直接添加 @Component 注解即可,也可在 xml 文件中配置
测试:
1
2
3
4
5
@Test void getUserTest () System.out.println(userMapper.getByIdAndUsername(1 , "yuxudong" )); }
控制台输出:
1
2
SELECT * FROM user WHERE id = ? AND username = ? {id=1, param1=1, username=yuxudong, param2=yuxudong}
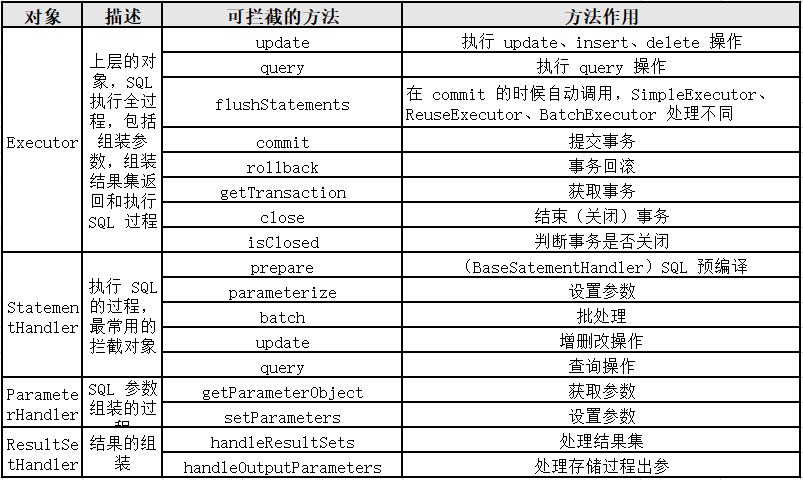
可供拦截的方法及说明:
markdown 画表格费劲,直接截图
原理分析 Mybatis 如何实现功能增强 很容易想到是使用到了动态代理。
在上面的自定义插件中,实现了 Interceptor#plugin(Object target) 方法,该方法的默认实现是返回一个 Plugin.wrap(target, this),跟进 Plugin 类中
Plugin.java
1
2
3
4
5
6
7
8
9
10
11
12
13
14
15
16
17
18
19
20
21
22
23
24
25
26
27
28
29
30
31
32
33
34
35
36
37
38
39
40
41
42
43
44
45
public class Plugin implements InvocationHandler private final Object target; private final Interceptor interceptor; private final Map<Class<?>, Set<Method>> signatureMap; private Plugin (Object target, Interceptor interceptor, Map<Class<?>, Set<Method>> signatureMap) this .target = target; this .interceptor = interceptor; this .signatureMap = signatureMap; } public static Object wrap (Object target, Interceptor interceptor) Map<Class<?>, Set<Method>> signatureMap = getSignatureMap(interceptor); Class<?> type = target.getClass(); Class<?>[] interfaces = getAllInterfaces(type, signatureMap); if (interfaces.length > 0 ) { return Proxy.newProxyInstance( type.getClassLoader(), interfaces, new Plugin(target, interceptor, signatureMap)); } return target; } @Override public Object invoke (Object proxy, Method method, Object[] args) throws Throwable try { Set<Method> methods = signatureMap.get(method.getDeclaringClass()); if (methods != null && methods.contains(method)) { return interceptor.intercept(new Invocation(target, method, args)); } return method.invoke(target, args); } catch (Exception e) { throw ExceptionUtil.unwrapThrowable(e); } } }
这也印证了插件是依靠动态代理的方式实现的
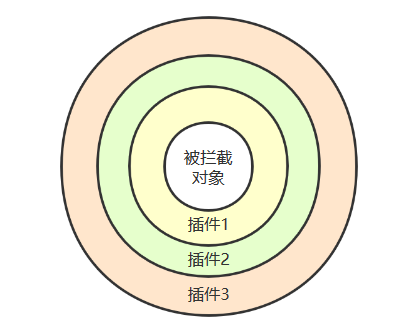
多个插件是如何实现层层拦截的 已知 Mybatis 是依靠动态代理实现的插件,在多个插件的情况下则是通过层层代理来实现层层拦截
插件定义的顺序:
插件1
插件2
插件3
代理执行顺序:
插件3
插件2
插件1
生成代理的方法 InterceptorChain.java
1
2
3
4
5
6
7
8
9
10
11
12
13
public class InterceptorChain private final List<Interceptor> interceptors = new ArrayList<>(); public Object pluginAll (Object target) for (Interceptor interceptor : interceptors) { target = interceptor.plugin(target); } return target; } }


